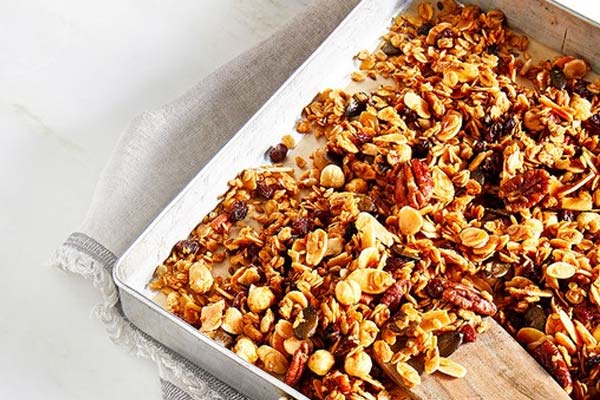
طريقة عمل الجرانولا: خطوات سهلة وسريعة لإعداد وجبة صحية ولذيذة
تعتبر الجرانولا وجبة صحية وشهية يمكن تحضيرها في المنزل بسهولة وبأقل تكلفة من شرائها جاهزة. تتكون الجرانولا بشكل عام من الشوفان والمكسرات والعسل والفواكه المجففة، وهي تعتبر وجبة مثالية للفطور أو الوجبات الخفيفة.
تحتوي الجرانولا على العديد من الفوائد الصحية، فهي تحتوي على الألياف والبروتينات والعناصر الغذائية الأساسية التي يحتاجها الجسم. كما أنها تساعد في تحسين صحة القلب وتقليل خطر الإصابة بأمراض السكري والسمنة.
هذا المقال سيقدم لكم طريقة عمل الجرانولا في المنزل بخطوات سهلة وبسيطة، حتى تتمكنوا من تحضيرها بأنفسكم والاستمتاع بوجبة صحية ولذيذة.
ما هي الجرانولا؟
الجرانولا هي وجبة خفيفة شهية وصحية، تتكون أساسًا من الشوفان والمكسرات والفواكه المجففة والعسل الطبيعي. تعتبر الجرانولا وجبة خفيفة مثالية للإفطار أو الوجبات الخفيفة بسبب قيمتها الغذائية العالية وقدرتها على تزويد الجسم بالطاقة اللازمة للحفاظ على النشاط والحيوية طوال اليوم.
تحتوي الجرانولا على العديد من العناصر الغذائية المفيدة للجسم، مثل الألياف والبروتين والفيتامينات والمعادن. كما أنها تحتوي على بيتا جلوكان الذي يساعد على تخفيض مستويات الكوليسترول في الدم ويعزز صحة الأمعاء.
يمكن تحضير الجرانولا بسهولة في المنزل باستخدام المكونات المفضلة، مثل بذور الشيا وزبدة اللوز وعباد الشمس والتوت المجفف وبذور دوار الشمس والفواكه المجففة. يمكن تناول الجرانولا بالحليب أو اللبن الرائب أو الزبادي أو العصائر أو يمكن تناولها كوجبة خفيفة مباشرةً.
بالإضافة إلى ذلك، فإن الجرانولا تتميز بأنها وجبة خفيفة منخفضة السعرات الحرارية، وهي تناسب الأشخاص الذين يتبعون نظامًا غذائيًا صحيًا ويرغبون في الحفاظ على وزن صحي.
طريقة عمل الجرانولا
تعد الجرانولا من الوجبات الخفيفة الصحية والشهية التي يفضلها الكثير من الناس. ويمكن تحضيرها في المنزل بسهولة وبخطوات بسيطة. فيما يلي طريقة عمل الجرانولا في المنزل:
المكونات:
- ثلاثة أكواب من الشوفان.
- ½ كوب لوز مقطع.
- ½ كوب جوز مقطع من النصف.
- ½ ملعقة ملح صغيرة.
- ½ ملعقة قرفة.
- ¼ كوب زيت جوز الهند.
- ½ كوب عسل.
- مستخلص الفانيليا.
الطريقة:
- يسخن الفرن على درجة حرارة 150 درجة مئوية.
- تخلط جميع المكونات الجافة (الشوفان، اللوز، الجوز، الملح، والقرفة) في وعاء كبير.
- يخلط العسل، زيت جوز الهند، ومستخلص الفانيليا في وعاء صغير، ثم يسكب فوق المكونات الجافة ويخلط جيداً حتى تتغطى المكونات الجافة بالخليط الرطب.
- يوضع المزيج في صينية مبطنة بورق زبدة ويتم تسويته بالملعقة.
- يوضع الصينية في الفرن لمدة 25-30 دقيقة، مع التحريك كل 10 دقائق حتى يتحول اللون إلى اللون الذهبي الفاتح.
- يخرج المزيج من الفرن ويترك ليبرد تماماً، ثم يتم تقطيعه إلى قطع صغيرة.
- يمكن تخزين الجرانولا في علب محكمة الإغلاق لحفظها لفترة طويلة.
وهكذا تكون الجرانولا جاهزة لتقدم كوجبة خفيفة صحية وشهية في أي وقت.
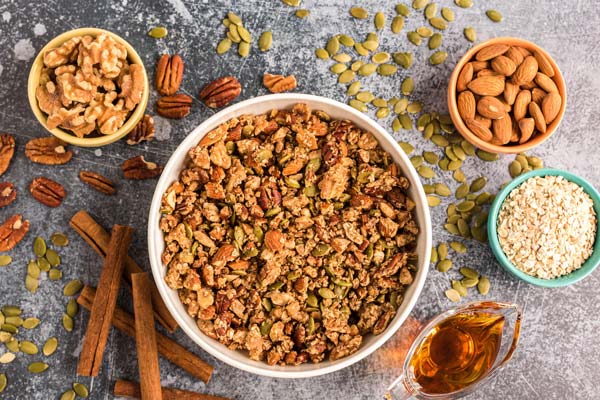
مكونات الجرانولا
تتكون الجرانولا بشكل رئيسي من الشوفان والمكسرات والعسل، ويمكن إضافة بعض الفواكه المجففة أو البذور حسب الرغبة. وفيما يلي قائمة بأهم مكونات الجرانولا:
- الشوفان: يعتبر الشوفان المكون الرئيسي في الجرانولا، حيث يمثل ما يقرب من 60% من مكوناتها. ويحتوي الشوفان على العديد من العناصر الغذائية المهمة مثل الألياف والبروتين والفيتامينات والمعادن.
- المكسرات: تضيف المكسرات نكهة لذيذة وقيمة غذائية عالية للجرانولا. وتشمل المكسرات المستخدمة في تحضير الجرانولا اللوز وجوز الهند والفستق والكاجو والمكسرات الأخرى.
- العسل: يستخدم العسل كمصدر للحلاوة في تحضير الجرانولا، ويضيف نكهة لذيذة وقيمة غذائية عالية. ويمكن استخدام العسل الطبيعي أو العسل الاصطناعي حسب الرغبة.
- الفواكه المجففة: يمكن إضافة بعض الفواكه المجففة للجرانولا لإضفاء نكهة حلوة ولذيذة، وتشمل الفواكه المجففة المستخدمة في تحضير الجرانولا التمر والزبيب والتوت البري والكرز المجفف.
- البذور: يمكن إضافة بعض البذور إلى الجرانولا لزيادة قيمة الألياف والبروتين، وتشمل البذور المستخدمة في تحضير الجرانولا بذور اليقطين وبذور الكتان وبذور السمسم.
- السكر: يمكن استخدام السكر لزيادة حلاوة الجرانولا، ويمكن استخدام السكر الأبيض أو السكر البني حسب الرغبة. ويمكن استخدام بدائل السكر مثل العسل أو شراب القيقب حسب الرغبة.
باستخدام هذه المكونات وبعض الإضافات الإضافية، يمكن تحضير جرانولا صحية ولذيذة في المنزل.
فوائد الجرانولا
الجرانولا هي وجبة إفطار خفيفة تحتوي على مزيج من الحبوب والمكسرات والفواكه المجففة والعسل أو السكر. وتعد الجرانولا من الوجبات الغنية بالعناصر الغذائية الضرورية لصحة الجسم، حيث تحتوي على الكثير من الألياف والبروتينات والفيتامينات والمعادن.
تحتوي الجرانولا أيضًا على مستويات عالية من الأحماض الدهنية الأساسية والتي تحمي الجسم من الإصابة بأمراض القلب والأوعية الدموية، وتعمل على خفض مستويات الكوليسترول الضار في الدم.
وبالإضافة إلى ذلك، فإن تناول الجرانولا يساعد في تحسين صحة الجهاز الهضمي، وتقليل مستويات السكر في الدم، وتحسين صحة الجلد والشعر، وتقليل فرص الإصابة بالسرطان، وتحسين النوم والحفاظ على الوزن المثالي.
ويمكن أيضًا أن تساعد الجرانولا في خفض ضغط الدم، حيث تحتوي على البوتاسيوم والمغنيسيوم اللذان يعملان على توسيع الأوعية الدموية وتحسين تدفق الدم في الجسم. وتشير بعض الدراسات إلى أن تناول الجرانولا يمكن أن يساعد في تقليل مستويات الضغط الانقباضي بنسبة تصل إلى 5 نقاط.
ومع ذلك، يجب الانتباه إلى أن الجرانولا قد تحتوي على كميات عالية من السكر والدهون المشبعة، وبالتالي يجب تناولها بشكل معتدل وكجزء من نظام غذائي متوازن.
وصفات لتحضير الجرانولا
تعد الجرانولا وجبة صحية وشهية يمكن تحضيرها في المنزل بسهولة باستخدام مجموعة متنوعة من المكونات الصحية. فيما يلي بعض الوصفات الشهية لتحضير الجرانولا:
وصفة الجرانولا بالفواكه المجففة
- المكونات:
- 2 كوب رقائق الشوفان
- 1/2 كوب زبيب
- 1/2 كوب توت مجفف
- 1/2 كوب عنب مجفف
- 1/2 كوب جوز
- 1/2 كوب عباد الشمس
- 1/2 كوب زبدة اللوز
- 1/2 كوب عسل
- 1/2 كوب زيت جوز الهند
- الطريقة:
- يسخن الفرن على درجة حرارة 150 درجة مئوية.
- يخلط الشوفان، الزبيب، التوت المجفف، العنب المجفف، الجوز، وعباد الشمس في وعاء كبير.
- يسخن زبدة اللوز، العسل، وزيت جوز الهند في قدر على نار متوسطة.
- يصب المزيج السائل فوق المكونات الجافة ويقلب جيداً.
- يوضع المزيج على صينية فرن ويخبز لمدة 20-25 دقيقة أو حتى يصبح لون الجرانولا ذهبياً.
- يترك الجرانولا ليبرد تماماً ويحفظ في وعاء محكم الإغلاق.
وصفة الجرانولا بالفواكه الطازجة
- المكونات:
- 2 كوب رقائق الشوفان
- 1/2 كوب توت طازج
- 1/2 كوب فراولة طازجة
- 1/2 كوب عنب أحمر طازج
- 1/2 كوب جوز
- 1/2 كوب عباد الشمس
- 1/2 كوب زبدة اللوز
- 1/2 كوب عسل
- 1/2 كوب زيت جوز الهند
- الطريقة:
- يسخن الفرن على درجة حرارة 150 درجة مئوية.
- يخلط الشوفان، التوت الطازج، الفراولة الطازجة، العنب الأحمر الطازج، الجوز، وعباد الشمس في وعاء كبير.
- يسخن زبدة اللوز، العسل، وزيت جوز الهند في قدر على نار متوسطة.
- يصب المزيج السائل فوق المكونات الجافة ويقلب جيداً.
- يوضع المزيج فوق المكونات الجافة ويقلب جيداً